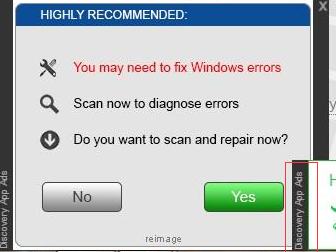
If you are seeing multiple floating ads labeled with “Discovery App Ads” and “Powered by Discovery App” on every website you visit, your computer is infected by adware or potentially unwanted programs. Discovery App is promoted as a useful tool that helps find web contents you like. However, it is actually unwanted program that often comes bundled with other infected software which you download from unreliable websites and install without deselecting additional bundles.
What Are the Problems Caused by Discovery App?
Discovery App gets in your computer without your knowledge and permission. Once installed, it will mess up your internet browsing with random pop-ups and constant redirects. Below are some baleful activities performed by Discovery App.
It can compromise all the browsers installed on your computer such as Chrome, IE and Firefox;
It can add unwanted browser extensions and plug-ins to your computer;
It can inject your browsers with various banners, pop-up windows, ad-boxes and in-text hyperlinks;
It can redirect your browser to third party websites or websites containing malware;
It can keep track of your online activity and collect your personal files stored by the web;
It can slow your internet by loading too many programs in the background;
It can trigger more threats that may damage your hard drive and decrease your computer performance...
How to Remove Discovery App and Fix Associated Problems?
Here is a comprehensive removal guide that may help you completely get rid of “Discovery App Ads” and the associated problems.
>> Click this link to get SpyHunter and fix your PC <<
Step 1: Remove Discovery App from Control Panel.
Windows 8
1. Click on bottom left corner of the screen.
2. Click on Control Panel.
3. Click Uninstall a Program.
4. Select Discovery App from the list and click Uninstall button.
Windows 7
1. Click on Start menu, then Control Panel.
2. Click Uninstall a Program.
3. Look for Discovery App from the list of programs and click Uninstall button on top.
Windows XP
1. Click on Start menu, then Control Panel.
2. Double-click Add or Remove Programs.
3. In the 'Currently Installed Programs' window, select Discovery App and then click Change/Remove.
Step 2: Remove browser extensions and delete cookies.
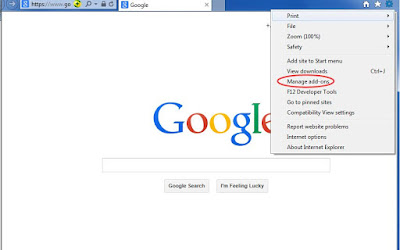
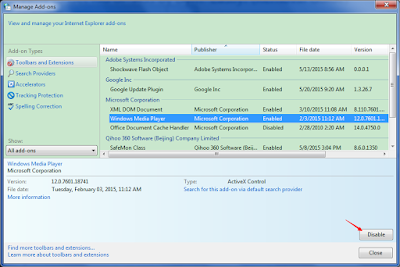
Internet Explorer
Menu/Tools >> Manage add-ons >> Toolbars and Extensions/Search Providers
2. Click on Control Panel.
3. Click Uninstall a Program.
4. Select Discovery App from the list and click Uninstall button.
Windows 7
1. Click on Start menu, then Control Panel.
2. Click Uninstall a Program.
3. Look for Discovery App from the list of programs and click Uninstall button on top.
Windows XP
1. Click on Start menu, then Control Panel.
2. Double-click Add or Remove Programs.
3. In the 'Currently Installed Programs' window, select Discovery App and then click Change/Remove.
Step 2: Remove browser extensions and delete cookies.
Internet Explorer
Menu/Tools >> Manage add-ons >> Toolbars and Extensions/Search Providers
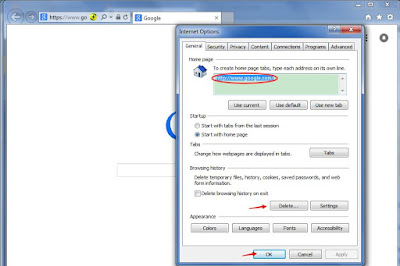
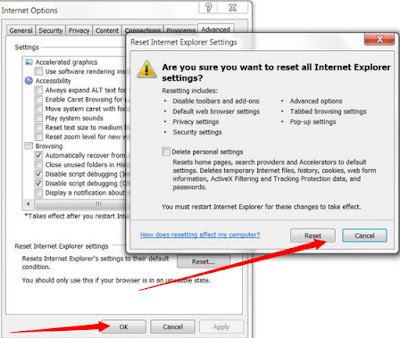
Tools >> Internet Options >> General tab >> Browsing history >> Delete...
Navigate to Advanced >> Reset... >> check Delete personal settings >> Reset >> Close
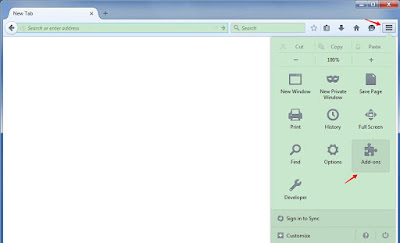
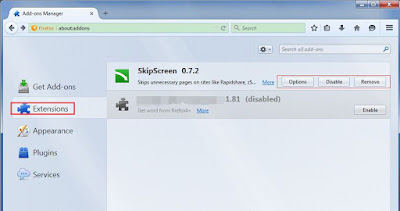
Mozilla Firefox
Firefox Menu>> Add-ons >> Extensions/Plugins
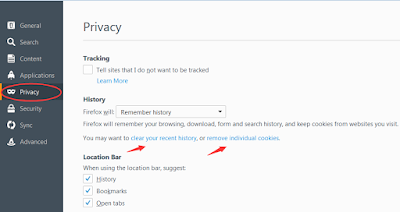
Tools >> Options >> Privacy >> Remove Individual Cookies >> Delete corresponding cookies
Google Chrome
Google Menu>> Tools/Settings >> Extensions
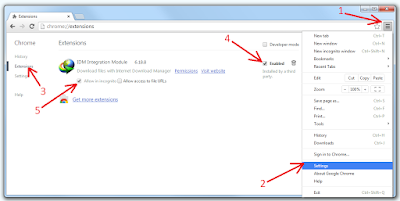
And then you can go to History to delete browsing history and cookies and cached images and files
Step 3: Delete files from local disk.
Show hidden folder: start menu >> type 'folder options' and hit enter >> 'View' >> show hidden folder
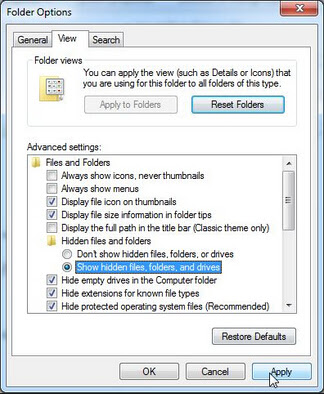
Delete suspicious files from the folders below.
%AppData%\<random>.exe
%CommonAppData%\<random>.exe
C:\Windows\Temp\<random>.exe
%temp%\<random>.exe
C:\Program Files\<random>
Delete suspicious files from the folders below.
%AppData%\<random>.exe
%CommonAppData%\<random>.exe
C:\Windows\Temp\<random>.exe
%temp%\<random>.exe
C:\Program Files\<random>
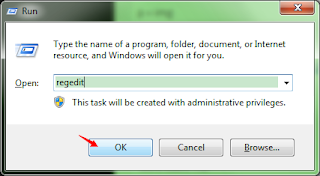
Step 4: Delete corrupted registry entries.
Press Win & R on your keyboard. Type 'regedit' and hit enter.
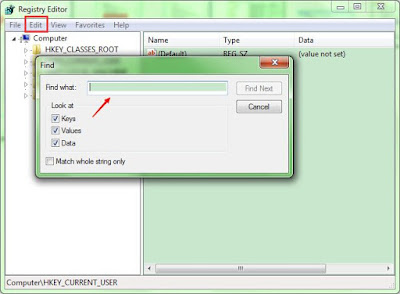
Click Edit > Find...
Here is a Removal Video for the Similar Adware. Please Watch it For Reference.
Note: SpyHunter has the ability to detect and remove rootkits, which are used to stealth install rogue anti-spyware programs and other trojans. It is designed to assist the average computer user in protecting their PC from malicious threats. Maybe the inexperience users can get help from it. If you find it hard to remove with the manual removal instruction, you can also use this automatic removal tool.

HKEY_LOCAL_MACHINE\SOFTWARE\<random>Software
HKEY_LOCAL_MACHINE\SOFTWARE\supWPM
HKEY_LOCAL_MACHINE\SYSTEM\CurrentControlSet\Services\Wpm
HKEY_LOCAL_MACHINE\SOFTWARE\supWPM
HKEY_LOCAL_MACHINE\SYSTEM\CurrentControlSet\Services\Wpm
Here is a Removal Video for the Similar Adware. Please Watch it For Reference.
Note: SpyHunter has the ability to detect and remove rootkits, which are used to stealth install rogue anti-spyware programs and other trojans. It is designed to assist the average computer user in protecting their PC from malicious threats. Maybe the inexperience users can get help from it. If you find it hard to remove with the manual removal instruction, you can also use this automatic removal tool.
SpyHunter's free scanner is for malware detection. You have the choice of buying SpyHunter for malware removal. Here are some install procedures for it. You can read it for reference.
Step 1: After finishing downloading, click Run to install SpyHunter step by step.
Step 2: After finishing installing, SpyHunter will scan and diagnose your entire system automatically.
Step 3: As the scanning is complete, all detected threats will be listed out. Then, you can click on “Fix Threats” to remove all of the threats found in your system.
Good to know:
SpyHunter responds with advanced technology to stay one step ahead of today’s malware threats. It offers additional customization capabilities to ensure every user is able to custom tailor this anti-malware application to fit their specific needs. It is great if you remove the threats on your own. If you cannot make it yourself, SpyHunter will be another choice for you.
2 comments:
Nice article, I will defiantly look forward for more!
Browser Hijacker Redirect
Useful post. Thanks For Sharing.........
Let us help you with printers, routers, website malware removal , slow laptops, and any other technology issue.Best Buy Systems is your trusted source for technical support in Valencia, California, USA. For any help you can call us our toll free number +1-888-339-8933 .
Post a Comment