“Every other day for the past 3 days, after starting my computer and trying to access the Internet, I get the following message:
- The proxy server isn't responding
- Check your proxy settings 127.0.0.1:3128.
- From the Settings charm, Go to Change PC settings > Network > Proxy.
- Make sure your firewall settings aren’t blocking your web access.
- Ask your system administrator for help.”
What’ Wrong with Your Computer? How to Solve it?
If you encounter this issue, your computer settings (proxy settings) might be maliciously distorted by some malware. You should go in and turn off the proxy button. And then delete 127.0.0.1 proxy settings registry and enable your default one. Here are the steps.
Step 1: Open Internet Explorer, click on Tools, and then navigate to Internet Options;
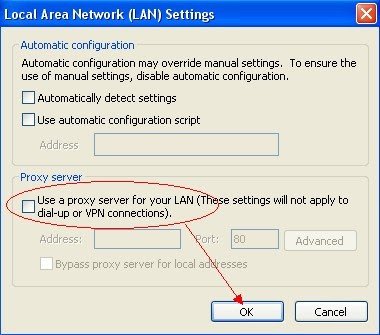
Step 2: Click on the Connections tab in the Internet Options and then click on the LAN settings button;
Step 3: Uncheck the check box labeled “Use a proxy server for your LAN” under the Proxy Server section and press OK.
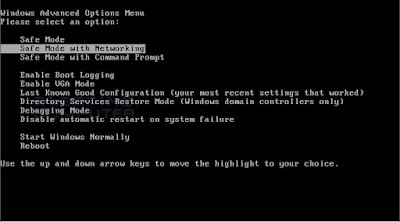
If you try this but fail because it comes back soon, you should reboot your computer to safe mode and modify and delete registry entries first.
Step 1: please restart your computer and before Windows interface loads, hit F8 key repeatedly. Choose “Safe Mode (with Networking)” option, and then press Enter key. System will load files and then get to the desktop in needed option.
Step 2: Open Registry Editor by pressing Windows+R keys, type regedit in Run box and click “OK” to proceed. When Registry Editor is open, search and get rid of all the malicious registry entries:


Step 2: Open Registry Editor by pressing Windows+R keys, type regedit in Run box and click “OK” to proceed. When Registry Editor is open, search and get rid of all the malicious registry entries:
Path: HKEY_CURRENT_USER\Software\Microsoft\Windows\Current Version\Internet Settings\
Find out ProxyEnable and change the value data into 0
And then delete ProxyServer 127.0.0.1:8888
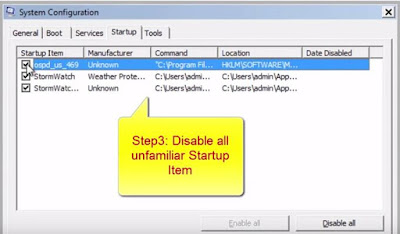
Step 3: Search msconfig from Start Menu search bar, hit enter to go to System Configuration, and then navigate to Startup. Disable all the suspected startup items.
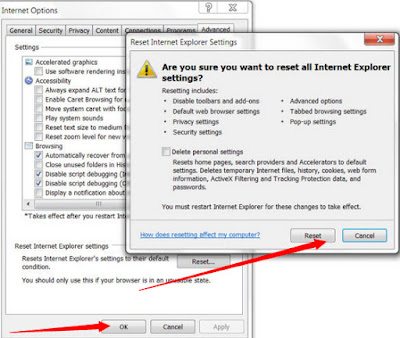
You might think of reset your browser settings if needed.
Automatically Remove 127.0.0.1 Proxy Server Setting and the Virus with SpyHunter
SpyHunter has the ability to detect and remove rootkits, which are used to stealth install rogue anti-spyware programs and other trojans. It is designed to assist the average computer user in protecting their PC from malicious threats. Maybe the inexperience users can get help from it. If you find it hard to remove with the manual removal instruction, you can also use this automatic removal tool.


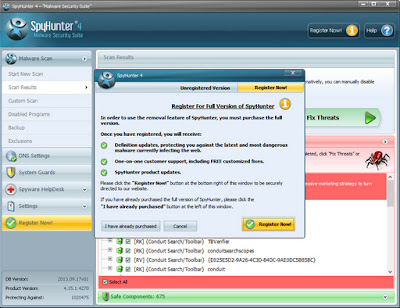
SpyHunter's free scanner is for malware detection. You have the choice of buying SpyHunter for malware removal. Here are some install procedures for it. You can read it for reference.
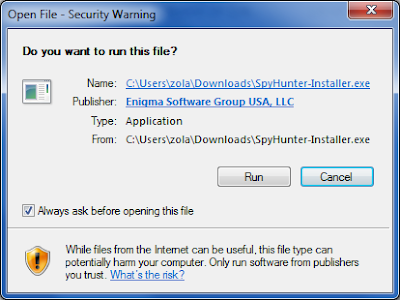
Step 1: After finishing downloading, click Run to install SpyHunter step by step.
Step 2: After finishing installing, SpyHunter will scan and diagnose your entire system automatically.
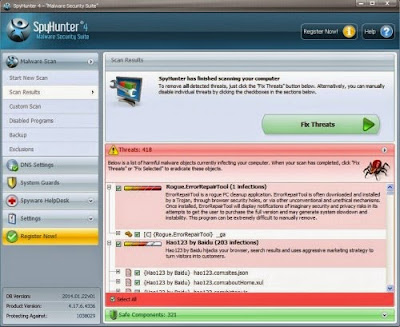
Step 3: As the scanning is complete, all detected threats will be listed out. Then, you can click on “Fix Threats” to remove all of the threats found in your system.
Good to know:
SpyHunter responds with advanced technology to stay one step ahead of today’s malware threats. It offers additional customization capabilities to ensure every user is able to custom tailor this anti-malware application to fit their specific needs. It is great if you remove the threats on your own. If you cannot make it yourself, SpyHunter will be another choice for you.
No comments:
Post a Comment