Know more about Rocket Tab
Are you recently annoyed about this Rocket Tab? What is it? It is classified as an adware which is claimed to improve your browsing activities. In fact, it seems intrusive for it always gets into your computer without your knowledge and display you annoying pop up ads no matter you want it or not. Here below is one piece of user’s complaints:
“It claims to be a handy search enhancement for Chrome, IE, etc. But I find it an annoying group of hot links that pop on top of almost every web page I view. rockettab.com says it is easily removable, but it is not. It does not show up as a program in Control Panel nor in Chrome advanced settings.. Malwarebytes and Avast do not see it. Start search does not find it.”
Yes, after it gets itself installed, it is not that easy to get rid of it off your computer as it states. Besides, it will display sponsored links, advertising banners on your search results. To completely get rid of it, we have to deal with registry, dll files, cookies, browser extensions, etc. it is not suggest to live with this rocket tab, otherwise, your computer will get more computer threats sneakily.
Step by Step Guide to Manually Remove Rocket tab
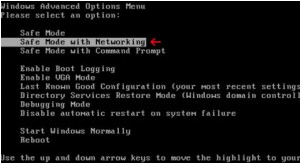
Step 1- Boot your computer into "safe mode with networking" by constantly tapping F8 key until Windows Advanced Options menu shows up.
Step 2- Reset Internet Explorer by the following guide (take IE as an example):
Open Internet Explorer >> Click on Tools >> Click on Internet Options >> In the Internet Options window click on the Connections tab >> Then click on the LAN settings button>> Uncheck the check box labeled “Use a proxy server for your LAN” under the Proxy Server section and press OK.
Step 3- Disable any suspicious startup items that are made by infections from rocket tab

For Windows Vista or Windows7: click start menu->type msconfig in the search bar -> open System Configuration Utility -> Disable all possible startup items generated from rocket tab.
Step 4-Restart your computer normally to check the effectiveness.
Method two: automatically remove rocket tab with SpyHunter antivirus.
SpyHunter is a powerful, real-time anti-spyware application that designed to assist the average computer user in protecting their PC from malicious threats like worms, Trojans, rootkits, rogues, dialers, spyware, etc. It is important to notice that SpyHunter removal tool works well and should run alongside existing security programs without any conflicts.
Step 1. Download SpyHunter by clicking on the icon below.

Step 2. Follow the details to complete the installation process. (Double click on the download file and follow the prompts to install the program.)


Step 3. After the installation, run SpyHunter and click “Malware Scan” button to have a full or quick scan on your computer.

Step 4. Tick "Select all" and press "Remove" button to get rid of all the detected threats on your computer.

Please be careful that the manual clean requires expert skills to handle. If you’re not that computer savvy, it will be very risky to process the instructions above on your own. To get rocket tab resolved safer and quicker, you're advised to download Spyhunter – the famous antivirus software here to save your time and remove all the possible malware infection completely from your system.
>>Scan Your PC and Remove rocket tab For Free!
>>Download rocket tab Automatic Remover Here!
SpyHunter is a powerful, real-time anti-spyware application that designed to assist the average computer user in protecting their PC from malicious threats like worms, Trojans, rootkits, rogues, dialers, spyware, etc. It is important to notice that SpyHunter removal tool works well and should run alongside existing security programs without any conflicts.
Step 1. Download SpyHunter by clicking on the icon below.
Step 2. Follow the details to complete the installation process. (Double click on the download file and follow the prompts to install the program.)
Step 3. After the installation, run SpyHunter and click “Malware Scan” button to have a full or quick scan on your computer.
Step 4. Tick "Select all" and press "Remove" button to get rid of all the detected threats on your computer.
Please be careful that the manual clean requires expert skills to handle. If you’re not that computer savvy, it will be very risky to process the instructions above on your own. To get rocket tab resolved safer and quicker, you're advised to download Spyhunter – the famous antivirus software here to save your time and remove all the possible malware infection completely from your system.
>>Scan Your PC and Remove rocket tab For Free!
>>Download rocket tab Automatic Remover Here!
No comments:
Post a Comment