About Ads by Iu
Ads by Iu often appears as banners, pop-ups, pop-unders, in-page, or in-text on the website that you visit. Is it strange? Actually, there may be an adware or potentially unwanted program in your computer that cause all these ads. So if you see pop-ups labeled with“Ads by Iu”, “Iu Ads”, “Powered by Iu”, or “Brought by Iu”, you should find out the adware or PUP and then remove it.
Here is a screenshot of Ads by Iu.

As a disturbing trouble maker, Ads by Iu are detested and rejected by many computer users. It can modify browser settings and mess up the whole web browser. If will find pop-up ads appearing with the purpose to allure you download or click the products or services it offers, you should be cautious. This adware may possibly record your search enquires and URL history, which may be send to the third party as the sales leads.
Please keep in mind that Ads by Iu can be downloaded and installed via its official website, but it is often promoted via free downloads, especially video player and download manager program. The best way to avoid this adware is to cut off its transmission channels. You should never download suspicious program from unreliable sources and please opt for Custom installation and check for optional downloads.
If you have already got this adware infection in your PC, please follow the guides below to remove it.
Here is a Removal Video for the Similar Adware. Please Watch it For Reference.
(If you can not get rid of Youfille.com by this method, you can download powerful removal tool to remove it.)
Step 1: Remove from control panel.
Windows 8

Internet Explorer

Mozilla Firefox
Windows 8
- Click on bottom left corner of the screen.
- Click on Control Panel.
- Click Uninstall a Program.
- Select Ads by Iu from the list and click Uninstall button.
Windows 7
- Click on Start menu, then Control Panel.
- Click Uninstall a Program.
- Look for Ads by Iu from the list of programs and click Uninstall button on top.
Windows XP
- Click on Start menu, then Control Panel.
- Double-click Add or Remove Programs.
- In the 'Currently Installed Programs' window, select Ads by Iu and then click Change/Remove.
Step 2: Erase from browsers.
Google
Chrome
- Select Settings
from Google Chrome menu.
- Go to Settings and
select Extension. Disable suspicious/newly-added
extensions
- Click on Show
advance settings to expand the current window.
- Click on "Reset
browser settings" button.
- You need to click
on Reset button to confirm the removal
of Ads by Iu entries.
Internet Explorer
- Select Tools from
Internet Explorer menu.
- Go to Manage
add-on and go to Toolbar and Extension. Remove suspicious/newly-added
add-ons.
- Choose Internet
Options from the list.
- Select Advanced Tab
from the opened window.
- Click on Reset button
to get rid of Ads by Iu and other adware.
- Once done,
click Close and then OK to apply the
changes.
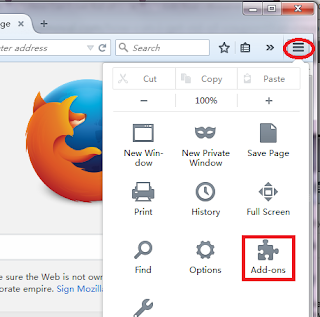
Mozilla Firefox
- Go
to Firefox menu from the top right. Select Add-on from
the draw-down list and remove suspicious/newly-added add-ons.
- Choose Help from
Mozilla Firefox menu.
- Click Troubleshooting
Information from the list.
- Click on Reset
Firefox button under "Reset Firefox to its default
state" area.
- Confirm the action and click Finish to finally remove Ads by Iu items.
Automatically Remove Ads by Iu with SpyHunter
SpyHunter has the ability to detect and remove rootkits, which are used to stealth install rogue anti-spyware programs and other trojans. It is designed to assist the average computer user in protecting their PC from malicious threats. Maybe the inexperience users can get help from it. If you find it hard to remove with the manual removal instruction, you can also use this automatic removal tool.

SpyHunter responds with advanced technology to stay one step ahead of today’s malware threats. It offers additional customization capabilities to ensure every user is able to custom tailor this anti-malware application to fit their specific needs. It is great if you remove the threats on your own. If you cannot make it yourself, SpyHunter will be another choice for you.
SpyHunter's free scanner is for malware detection. You have the choice of buying SpyHunter for malware removal. Here are some install procedures for it. You can read it for reference.
Step 1: After finishing downloading, click Run to install SpyHunter step by step.
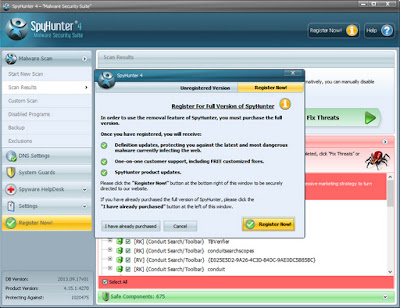
Step 2: After finishing installing, SpyHunter will scan and diagnose your entire system automatically.
Step 3: As the scanning is complete, all detected threats will be listed out. Then, you can click on “Fix Threats” to remove all of the threats found in your system.
Good to know:
No comments:
Post a Comment